Setup AnythingLLM on Digital Ocean
Open Source AI and LLMs are the path forward, as also recently a famously infamous company has declared. Therefore I checked out some of the available Open Source projects and stumbled upon AnythingLLM. What I like about it is that you can plug-in any LLM, you can run it on a server, access it through a web frontend and - this is super nice - it supports multiple users!
This is why I decided to setup a demo instance on Digital Ocean and test it. Although the community has added several cloud deployment setups, the whole process is not fully documented and that is why I am sharing this guide. I hope it saves you some time in case you also want to spin up a droplet and share it with some co-workers - without wasting energy on configuration.
Check the bonus section to enable HTTPS.
Requirements
- DigitalOcean account with billing information
- Since this guide aims to deploy to Digital Ocean, you will need to have a valid Digital Ocean Account and create a personal access token for Digital Ocean.
- If you do not have an account yet, you can use my referal link to get a free $200 credit.
- terraform
- Follow the instructions in the official Terraform documentation for your operating system.
- git
Getting started
Clone the repository to your local machine:
git clone https://github.com/Mintplex-Labs/anything-llm.git
cd anything-llm
Configure terraform:
- Open the file
digitalocean/terraform/main.tf - Search for the line with a comment “Add your DigitalOcean API token here”
- Add Digital Ocean Token in the line below
- Optionally, adjust the droplet size to your needs. You can check API slugs. To further optimize the AI it could be necessary to go with GPU optimized droplets. More on that maybe on another post. I have chosen
s-4vcpu-8gbas a good starting point.
Configure docker:
- Add new
.envfile atdocker/.env - Insert the minimum configuration:
SIG_KEY='GENERATE_A_KEY' # Please generate random string at least 32 chars long.
SIG_SALT='GENERATE_A_KEY' # Please generate random string at least 32 chars long.
JWT_SECRET='GENERATE_A_KEY' # Please generate random string at least 32 chars long.
AUTH_TOKEN='CHOSE_A_STRONG_PASSWORD' # This is the password to your application

STORAGE_DIR='/app/server/storage'
LLM_PROVIDER='ollama'
OLLAMA_BASE_PATH='http://172.17.0.1:11434' # Use 172.17.0.1 instead of `host.docker.internal`, otherwise the host cannot be reached.
OLLAMA_MODEL_PREF='llama3.1'
OLLAMA_MODEL_TOKEN_LIMIT='4096'
OLLAMA_KEEP_ALIVE_TIMEOUT='300'

EMBEDDING_MODEL_PREF='nomic-embed-text:latest'
EMBEDDING_ENGINE='ollama'
EMBEDDING_BASE_PATH='http://172.17.0.1:11434' # Use 172.17.0.1 instead of `host.docker.internal`, otherwise the host cannot be reached.
EMBEDDING_MODEL_MAX_CHUNK_LENGTH='8192'

VECTOR_DB='lancedb'
WHISPER_PROVIDER='local'
DISABLE_TELEMETRY='true'
TTS_PROVIDER='native'

#------ Serper.dev ----------- https://serper.dev/
AGENT_SERPER_DEV_KEY='SIGN_UP_TO_GET_A_FREE_KEY'

#------ Serply.io ----------- https://serply.io/
AGENT_SERPLY_API_KEY='SIGN_UP_TO_GET_A_FREE_KEY'
Deploy to Digital Ocean via Terraform
Run the following commands to initialize Terraform, review the infrastructure changes, and apply them:
terraform init
terraform plan
terraform apply
On success, terraform will return you the freshly created droplet’s IP.
SSH into your droplet using the password that DO will send you via email. Follow the initial password-change procedure and then check if the deployment was successful, by running:
tail -f /var/log/cloud-init-output.log
Additionaly, you can check if your docker instance is running and if there are any errors in the logs:
docker ps
# will return a running instance if there was no problem

docker logs _replace_with_your_instance_id_ -f
# will follow on any logs for the instance
Install and Configure Ollama
Above we have configured anyhting-llm to use Ollama as our LLM provider. I have chosen this since it is free and open source, and also relatively easy to setup.
To install Ollama on your DO droplet, SSH into your droplet and run:
cd ~
curl -fsSL https://ollama.com/install.sh | sh
Verify Installation:
ollama -v
ollama version is 0.3.0
Configure Ollama to be accessible for anyhting-llm:
This guide has been taken from Ollama FAQ.
- Edit the systemd service by calling systemctl edit ollama.service. This will open an editor.
- Add a line Environment under section [Service]:
[Service] Environment="OLLAMA_HOST=0.0.0.0" - Save and exit.
- Reload systemd and restart Ollama:
systemctl daemon-reload
systemctl restart ollama
Install language model with ollama:
ollama pull llama3.1
# since we have specified llama3.1. You can chose anything you want.
Login to your anything-llm application
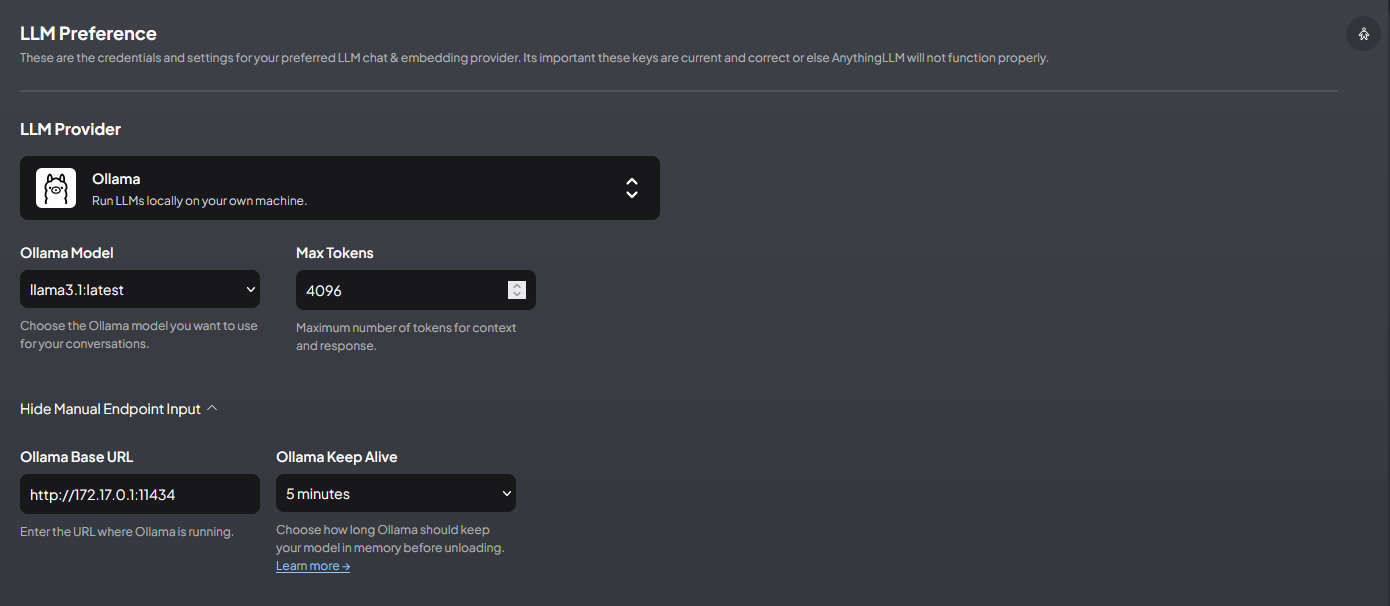
Navigate with your browser to <droplet-ip>:3001 and login with your application password (check your .env for AUTH_TOKEN)
Go to http://<droplet-ip>:3001/settings/llm-preference and verify that it looks like this:
That’s it! You can create a new workspace now and chat with llama3.1!
BONUS 1: Setup wildcard DNS for your droplet IP
In order to make your application more accessible, you can setup a wildcard DNS instead of using the droplet IP address. There are multiple free providers in the web, such as nip.io.
Login to Digital Ocean Cloud:
- Copy your droplet IP address, e.g. 116.203.255.68
- Go to “Networking” under Manage and choose the “Domains” tab
- Enter the droplet IP + nip.io suffix, e.g. 116.203.255.68.nip.io, www.116.203.255.68.nip.io
- Select the project with the droplet and add domain
Your anything-llm application should soon be accessible at http://%ip-to-your-droplet%.nip.io:3001/
BONUS 2: Enable HTTPS for anything-llm
Pre-Requirement: You need a working domain to request a SSL certificate. See Bonus 1 to setup a wildcard DNS.
To setup HTTPs, we will need to spin up a webserver, configure proxy-forwarding and install the SSL certificate. The certificate can be obtained with certbot (Let’s Encrypt).
Install nginx
sudo apt update
sudo apt install nginx
Configure nginx
Delete the default configuration and create a new configuration file for your droplet’s domain, e.g. 116.203.255.68.nip.io
sudo rm /etc/nginx/sites-enabled/default
sudo touch /etc/nginx/conf.d/116.203.255.68.nip.io.conf
sudo nano /etc/nginx/conf.d/116.203.255.68.nip.io.conf
The file confiugres nginx to run as a proxy server, by forwarding port 80 to 3001, where anything-llm is served through docker.
server {
    listen 80 default_server;
    listen [::]:80 default_server;
    server_name 116.203.255.68.nip.io;

    location / {
        proxy_pass  http://127.0.0.1:3001/;
    }
}
Install certbot
Certbot is a tool to obtain SSL certificates and can be installed with python.
sudo apt update
sudo apt install python3 python3-venv libaugeas0
sudo apt-get install python3-certbot-nginx

sudo python3 -m venv /opt/certbot/
sudo /opt/certbot/bin/pip install --upgrade pip

sudo /opt/certbot/bin/pip install certbot

sudo ln -s /opt/certbot/bin/certbot /usr/bin/certbot
Run certbot
Finally, to obtain the certificate run certbot in nginx mode using your droplet domain. Certbot will also automatically configure nginx for your domain. It is important that the domain name is identical with the one used in .conf file.
sudo certbot --nginx -d 116.203.255.68.nip.io
Allow https through firewall (if enabled)
In case your droplet has a firewall installed, allow HTTPS on port 443.
    sudo ufw allow 'Nginx Full'
    sudo ufw delete allow 'Nginx HTTP'
Automatically renewal
Finally, add a cronjob to automatically renew your SSL certificate
crontab -e
Use nano or anothe editor to enter following content.
0 12 * * * /usr/bin/certbot renew --quiet