Setup Stable Diffusion on your local machine
This is a quick guide to setup Stable Diffusion on your local machine. It aims to introduce generative AI newcomers (as me), since documentation around the topic is very confusing and bloated. The easiest and most popular approach to setup a web interface that ships everything you need, such as Stable Diffusion web UI. With this UI installed it will be very easy to switch between models, add extensions and use the query prompts in different szenarios.
Why should you setup Stable Diffusion locally?
Stable Diffusion is a deep learning, text-to-image model released in 2022 based on diffusion techniques. You can use it to generate images from text.
By running this locally you will have your full creative freedom, your data will be staying with you and of course there are no limits to what you want to generate (except your RAM limit). The downside is of course the performance can never be as good as with Cloud AI providers. But we will get there one day..
Requirements
Hardware
A good GPU and enough CPU + RAM is required to run the Stable Diffusion model on your own machine. Here is a simplified overview of minimum hardware requirements. In general it is recommended to go with NVIDIA Graphic Cards, since they support CUDA out of the box. Also see NVIDIA’s overview on CUDA compatible GPU to be sure your setup is ready for stable diffusion.
CUDA
CUDA is a parallel computing platform and programming model developed by NVIDIA for general computing on graphical processing units (GPUs). With CUDA, developers are able to dramatically speed up computing applications by harnessing the power of GPUs.
CUDA is a hard requirement for PyTorch to run, that is needed to sucessfully install Stable Diffusion web UI.
Since installing and setting up CUDA on your machine can be challenging, I am going the extra mile and share how to setup CUDA, before coming to Stable Diffusion itself.
Identify required CUDA Toolkit version
Depending on your Operating System and Graphic Card you will need to target the fitting CUDA version. The easiest way to find out is as follows:
Check the PyTorch matrix to find out the latest supported CUDA versions. The PyTorch Matrix can be found on their website and allows to select your requirements. In this guide we will chose Linux with Python.
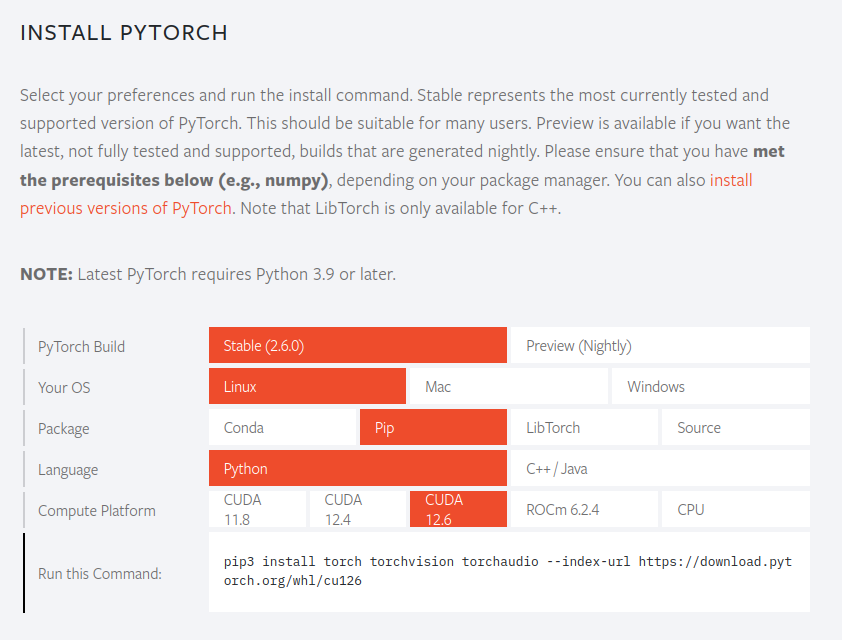
As you can see from the Matrix, the latest supported version is CUDA 12.6, preceded by 12.4 and 11.8. We will start with 12.6.
Verify compatible CUDA Toolkit version
Next we will check if CUDA is available for your machine’s operating system and architecture. Before we check that, we need to know our system’s architecture and operating system. In Linux Ubuntu you can run the following commands to get the exact information:
uname -p
# architecture

cat /etc/os-release
# os version and information
In this case we are running Ubuntu 24.04 on x86_64 architecture. Now that we know that, we can check with the NVIDIA Matrix if CUDA 12.6 is available. You can find the CUDA Matrix on the NVIDIA developer page, when you search for “CUDA 12.6 Toolkit”. The NVIDIDA CUDA 12.6 Toolkit Matrix selected for this guide looks as follows.
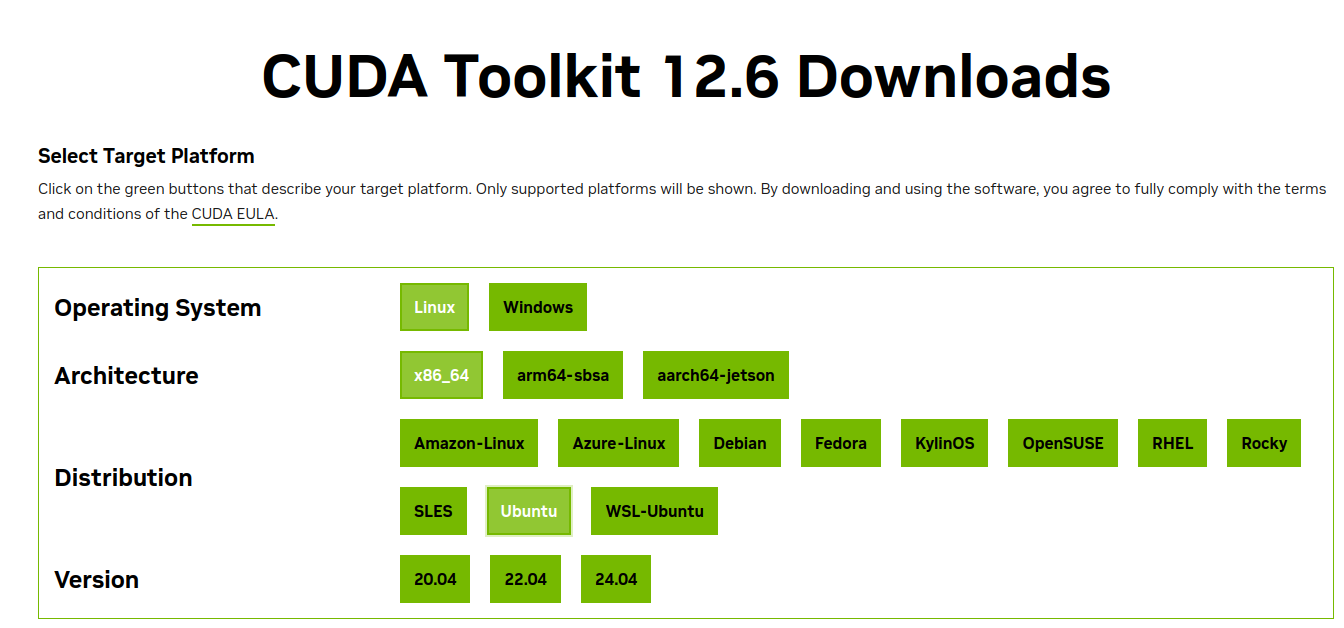
As we can see, CUDA 12.6 is available for Ubuntu 24.06 - yeay! If this would not be the case, we will need to check the CUDA Matrix for versions 12.4 and then 11.8.
Install CUDA Toolkit
Resuming to the NVIDIA CUDA Matrix result, you can select an installation method. In my opinion, the easiest method would be “network install” whereby you have to run the follwoing commands:
wget https://developer.download.nvidia.com/compute/cuda/repos/ubuntu2404/x86_64/cuda-keyring_1.1-1_all.deb
sudo dpkg -i cuda-keyring_1.1-1_all.deb
sudo apt-get update
sudo apt-get -y install cuda-toolkit-12-6
The installation may take some take and require a reboot. But do not worry this works like a charm.
Install CUDA Drivers
Finally, for the CUDA Toolkit to work, you need to have the latest drivers available. To update your drivers you can run the following commands, after you have performed the above CUDA Toolkit installation:
sudo apt-get install -y nvidia-open
# installs open source drivers

sudo apt-get install -y cuda-drivers
# installs proprietary drivers
Alternatively, on Ubuntu you can use the Software Updater and chose the driver package that suits you best.

Verify CUDA Toolkit and Drivers
Now that we have installed the CUDA Toolkit and Drivers let’s verify everything is setup correctly.
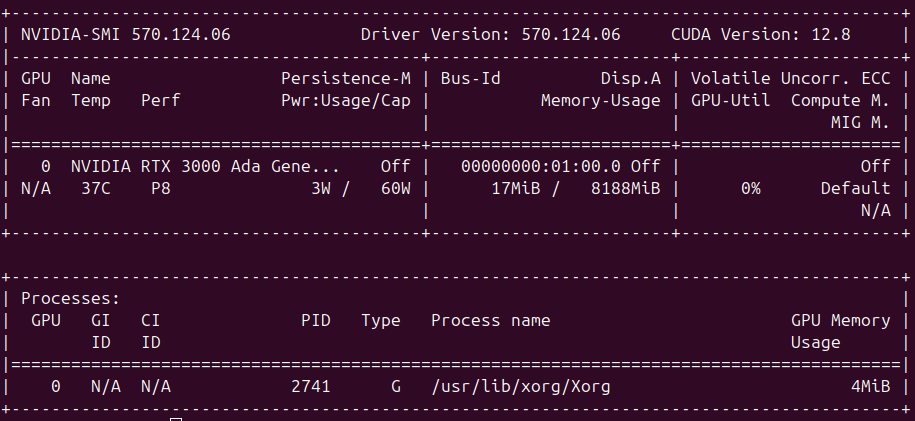
Run the following command to see the latest supported CUDA Toolkit version. On the upper right corner you will see the latest supported version. If this is equal or above the CUDA Toolkit you want to use, then your are good to go.
nvidia-smi
Install Stable-Diffusion-Web-UI
We will use the automatic installation approach, that will pull all required dependencies and spin up the local webserver for the UI. The following are condensed and improved instructions from the original documentation for automatic install on Linux. Since we setup CUDA for Linux, let’s continue on the same basis (Debian based, Ubuntu 24.04).
Install OS dependencies
sudo apt install git libgl1 libglib2.0-0 google-perftools

sudo add-apt-repository ppa:deadsnakes/ppa
sudo apt update

sudo apt install python3.11 python3.11-venv
Clone the repository
git clone https://github.com/AUTOMATIC1111/stable-diffusion-webui.git
cd stable-diffusion-webui/
Edit the config
First open the config in the editor of your choice (nano in my case):
nano webui-user.sh
Then insert/uncomment the following lines and adjust them.
#!/bin/bash
#########################################################
# Uncomment and change the variables below to your need:#
#########################################################

# Install directory without trailing slash
#install_dir="/home/$(whoami)"

# Name of the subdirectory
#clone_dir="stable-diffusion-webui"

# Commandline arguments for webui.py, for example: export COMMANDLINE_ARGS="--medvram --opt-split-attention"
#export COMMANDLINE_ARGS=""

# python3 executable
python_cmd="python3.11"

# git executable
#export GIT="git"

# python3 venv without trailing slash (defaults to ${install_dir}/${clone_dir}/venv)
#venv_dir="venv"

# script to launch to start the app
#export LAUNCH_SCRIPT="launch.py"

# install command for torch
# you can check the version specifc TORCH_COMMAND from PyTorch Matrix
export TORCH_COMMAND="pip install torch torchvision --index-url https://download.pytorch.org/whl/cu126"

# Requirements file to use for stable-diffusion-webui
#export REQS_FILE="requirements_versions.txt"

# Fixed git repos
#export K_DIFFUSION_PACKAGE=""
#export GFPGAN_PACKAGE=""

# Fixed git commits
#export STABLE_DIFFUSION_COMMIT_HASH=""
#export CODEFORMER_COMMIT_HASH=""
#export BLIP_COMMIT_HASH=""

# Uncomment to enable accelerated launch
#export ACCELERATE="True"

# Uncomment to disable TCMalloc
#export NO_TCMALLOC="True"

###########################################
Install and run the web UI
Only run this command after you have succesfully edited the config. If you have applied everything as described, it should not throw any errors related to CUDA.
./webui.sh
Congrats! You can now navigate to http://127.0.0.1:7860/ (or the browser may open from itself) and use Stable Diffusion from your browser.
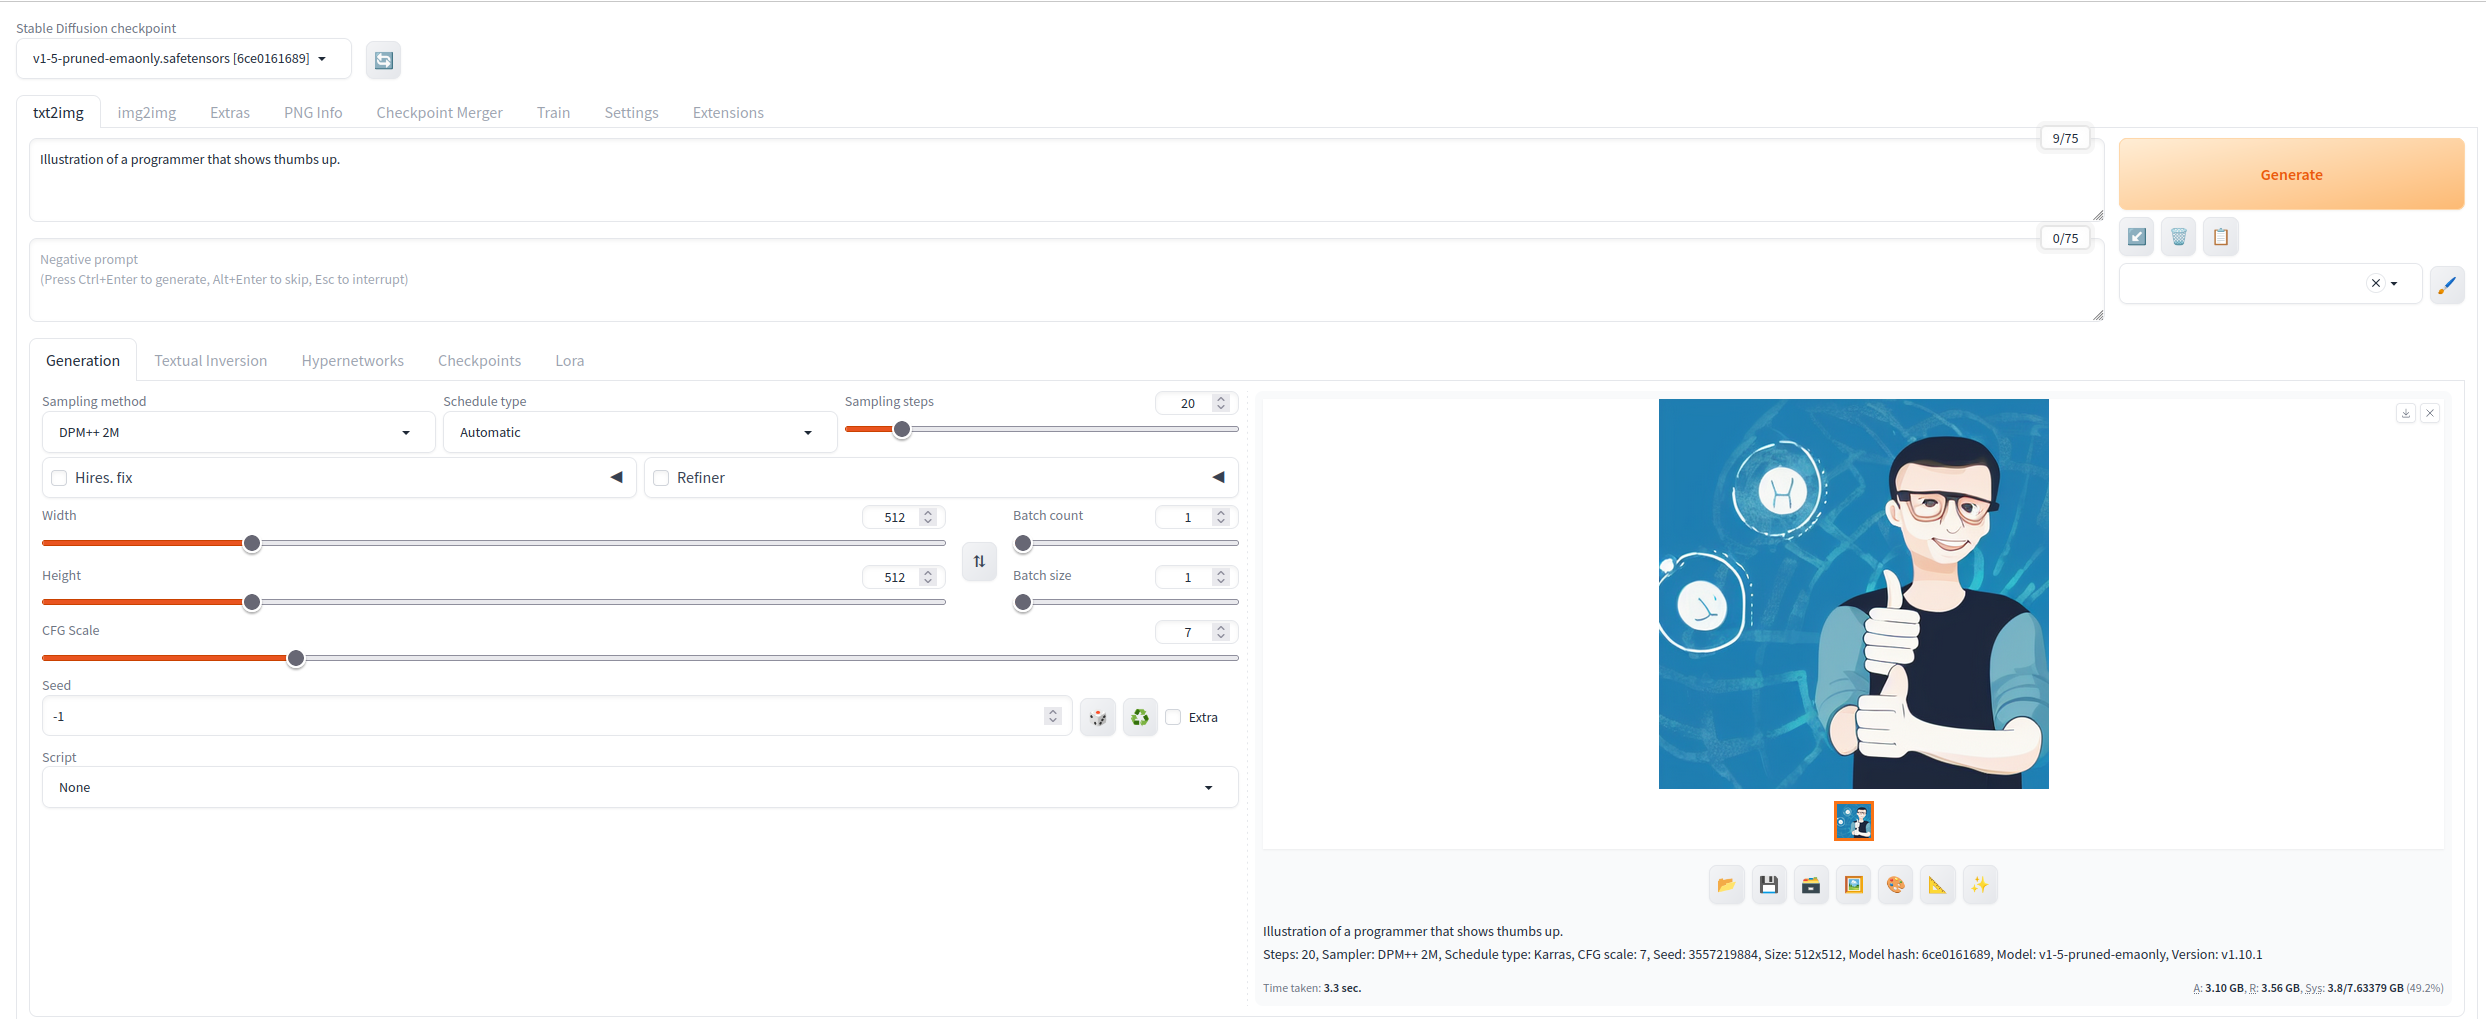
Next, you can check out SD WEB UI features to see what is possible.